Friday, April 30, 2010

Happy Graduation!!

If you are coming from Everyday Cricut-Thank you and I would love for you to follow me.

Not coming from Everyday Cricut Blog and want to win prizes-click HERE

Need a graduation gift idea?


First of all the Card was made using Hello Kitty Greeting (Graduate Hello Kitty) cut at 3.5 in. and Beyond Birthdays for (You did it) cut at 1.5 inch. I distressed it with Tim Holtz "Black Soot" ink and stickles in a few places. I gave the tassel a 3D look using embroidery floss. Add a little ribbon and a pop dot under the graduation cap and your done. The paper is by SU
This is a gift card holder that was cut from Just Because at 3.5 in and the diploma was cut from Hello Kitty Greetings at 3 in. I just used the SU paper I used for the card for the background.

This is just a paint can. I covered with card stock that matches SU paper that I distressed using the same black ink. I used Locker Talk for the word graduation. 
The graduation cap was made by taking my Crop-a-dial to punch a whole in the center. I then cut the square with rounded corners from George at 5 in. and used my I-top to make the brad. And last but not least is the tassel. 
 This is exactly how I made the tassel.  I tied it off knoting it right under the band (two times).  I then cut about 1/4 inch above the knot.  As you can see by where I placed the scissors this is where I cut to make it the tassel.  For the black ribbon I just ran it up thru the floss and put a little glue inside to hold.
It is a little difficult to explain-so if you have any questions, please do not hesitate to email me directly.

Peace, Love & Happiness

Ok-My daughter loves the peace sign.  When I found this Doodlebug paper I knew I had to have it.  Hope you like my layout.  Kind of busy but I like it.
The cartridges used were-Cars (Peace Sign's), Mickey & Friends (Cloud's and rainbow),  Hannah Montana (for happiness & 5 reasons I love you), Paisley (Girlie words & Flowers),  New Arrival (Love), Graphically Speaking (Smiley Face)

Can I tell you I LOVE MY GYPSY?  The lookup feature it awesome.  That is why I tend to use alot of carts.
The centers of the flowers are SU corduroy brads. Love them.

Happy National Scrapbooking Weekend!!!!

Thanks for looking

Friday, April 23, 2010

More Wall Art! I just love to Alter

Ok-Another piece of wall art.

The cartriges used were-Hannah Montana font (Daddy's Girl), Florishes from Accent Essentials(I did one normal and one on flip) and heart can be found on many cartridges and "Embrace" was cut from Lyrical Letters.

This is actually just a piece of wood that I bought at Ben Franklin for $1.45.  I covered the front with the pink paper.  The paper is Kioshi by Basic Grey and brown cardstock.  I inked the edges with brown.  And distressed most of the items with either brown or green.  I also painted the back.  And last but not least I used a Prima flower at the top with bling. 

(I found the quote on a picture at Target so I had to do it.)

Thanks for looking...  Email me with any questions..

Friday, April 16, 2010

Questions regarding Canvas!

First question-Where did I get the crocheted flowers?  No-I did not make them. (not a chance) I actually ordered them from SU last year and I am finally using them.  I do know someone that makes them and can do them in the color of your choice. They are 2/$1

Second question-One I missed in my directions.  After I decided the pattern I adhered the papers to a 12x12 piece of cardstock. (I was not sure if this was going to work so I did not put it directly on the canvas)  After I had the 12x12 covered I then trimmed about 1/8 an inch around the whole page and that allowed for the peek of the canvas.

For the adhesive I used-Scotch Adhesive.   I tried the ATG and it did not work very well.  After I glued I then turned the canvas face down and placed a book around the edges to apply pressure.

Let me know if you have any more questions.

Thursday, April 15, 2010

Wall Art-12x12 Canvas

Yes- Ladies this is a 12x12 Canvas.  I started with 2x2 pieces of paper and just covered the edges of one square with the next 2x2 square that I am using next.  I recommend that you start by just laying them out until you find the pattern that you like.  As far as the embellishments-well use what you want.  This paper is actually retired SU paper.  I just love this paper. Carts used were-Oh! A little of everything... (ha, ha)
I can't do anything unless I distress it.  So I distressed the edges of the canvas.  As always-let me know if you have any questions.  Enjoy!

Sunday, April 11, 2010

Winner, winner chicken dinner !

Congrats to Lisa on winning my drawing for the Stamping Solutions cart, please e-mail me your address so I can get it in the mail to you on Monday. Winner has 2 weeks to claim prize or I will re-draw for another winner. Thank you all for all your amazing comments !

Once I hit 300 followers, there will be more blog candy to come, so send your friends.

****Happy Sunday, HUGS****

"Lisa said...


Love the cards and really loved the LO you did for Everyday Cricut!!!! It completely touched my heart. :) Thanks for the generous opportunity to win the yummy blog candy! Becoming a follower now, and will put your blinky on my blog (not a real exciting one, but hey, ya gotta start somewhere!!! LOL)


Thanks for sharing your Awesome talent, and thanks to Monique for sending me your way. Looking forward to seeing more of you projects here and at Everyday Cricut!!!

*hugs*"


Lisa Sturgill
http://thegirlnextdoorgonebad.blogspot.com/

Friday, April 9, 2010

Scrapbook Steals Deal of the Day-Spring Has Sprung-HAS SOLD OUT

Happy Friday!!  I was asked by Scrapbook Steals to design with this awesome kit at they are featuring today.  OMG-This kit is fantastic...  They are sure to sell out so click HERE quick... I also have to tell you that they are a great company to work with.  They always feature a deal a day.  They show the "Deal of the Day" at 9am MST to see what todays feature it. And if you are not a fan on facebook add them. 
I added a little cricuting.  The cuts from Mickey & Friends were the tree at 7 1/4, sun 1in and clouds at 3in.  The hill under the tree is from Walk in the Garden cut at 4 in. The cuts from Easter 2010 cart were eggs at 1in and bunnies at 1 1/2.

The 3-D stickers were fun to use.

This card I did just a little sewing very easy to do.   The next card I used my cricut to cut the pears at 3in.

Please feel free to ask me any questions.  And don't forget to become a follower and comment to be put in the drawing for blog candy.  See post  below.

Monday, April 5, 2010

*****Blog Candy*****

I have blog candy....   Stamping Solution Cartridge!!!!


I will announce the winner on Sunday, April 11th.

To enter-Make sure you are a follower and comment. Once I hit 500 followers I will have more candy.  Stay tuned.

For additional entries-Add my Bling Queen button to your blog and tell your friends.  Here is a picture of a few cards that I made with help of this cart. (Music note from Hannah Montana & Bird was made with SU punch)

Friday, April 2, 2010

"My Hero Mom"

Hello everyone! This is the project that is being featured on "Everyday Cricut"  click here to enter great giveaways.  A huge thank you to Joy & Melanie for this peachy opportunity. Tune in the first Saturday of next month for my next project.  (YOU WILL LOVE IT)

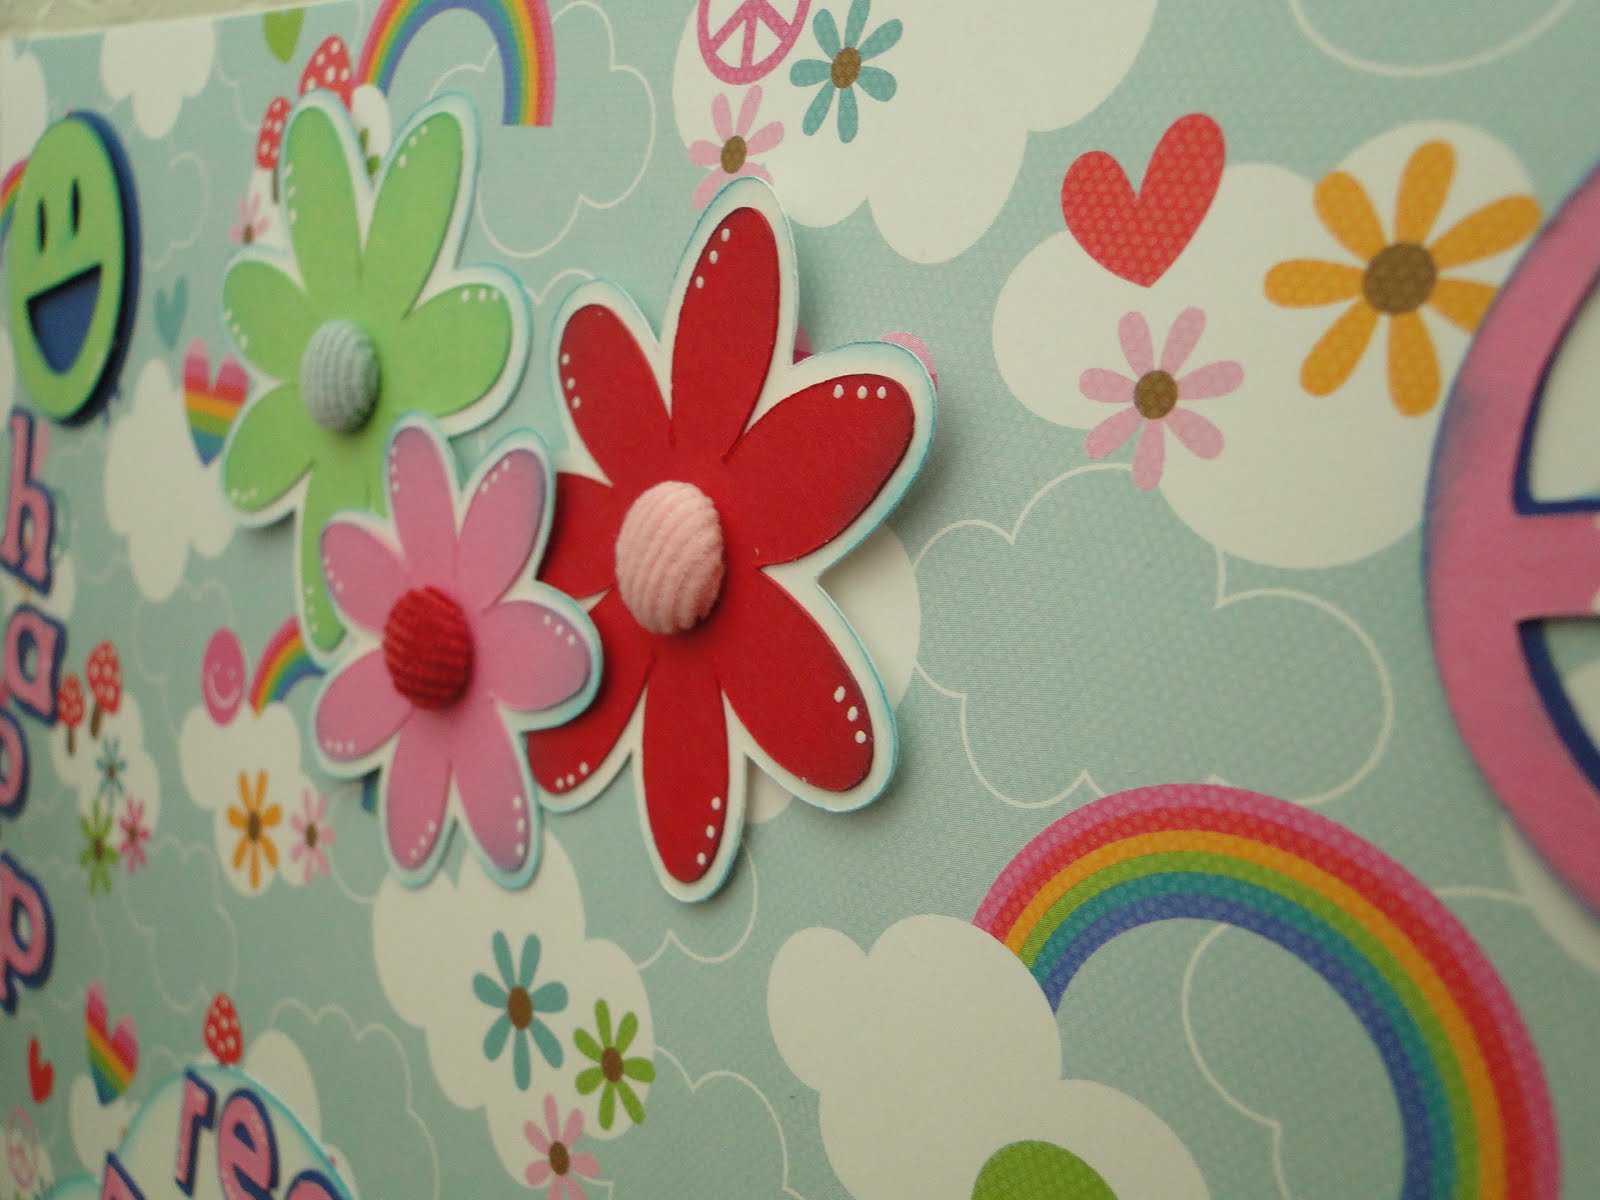
For my Mother’s Day project, I decided to do a 2 page layout in remembrance of my mom that passed away in January of 2007, who was my hero. I used the “Origins” line from Basic Grey, which is so fabulous and beautiful.

To create the layout, I built everything on the 2 green floral background sheets. I then added the 6x12 yellow floral piece to each side and wrapped the brown Stampin’ Up! ribbon around each page to cover the seam, adding a faux bow to the right page.

I cut the “My Hero” phrase from the Stand & Salute cartridge at 5” and trimmed off the extra stars. I also cut the shadow in the same size. The top layer of this cut is pop-dotted above its shadow for added depth. The “Mom” cut is from the Mother’s Day mini cartridge, and this was cut at 2” and layered onto its shadow. “Memories” and “beautiful” were both cut from the Home Accents cartridge at 1 ¼” and shadowed. All of the fun little flowers are from Life’s a Beach, and were cut at various sizes with layers and pop dots galore. The adorable mom with child silhouette cut is from A Child’s Year, and cut at 5” along with the shadow. All of the lighter colored cuts were lightly inked with Jumbo Java VersaMagic chalk ink. I also added some white dots with my white Signo Uniball pen.

The sweet yellow silk flowers are from Petaloo, and add just the right touch with this paper line. I cut 2 green photo mats with my paper trimmer, and these both measure 4 ¾” x 4”. The larger yellow mat is 7 ¼” x 5”. This is a great layout for black & white or sepia toned pictures, and would also work well with more modern pictures. Can you say “versatile”? Shut the front door as Joy would say. (I think she stole it from Scrap Guy)

Don't forget to enter the expression giveaway here. You have until Wednesday when they will have a Ustream to announce the winner.

I will also have blog candy on Tuesday so come back for MORE..

Thursday, April 1, 2010

Do not tell anyone I told you this!!!!!! Shhhh

Oh NO - the Top Secret Mission is Spreading...The Above Rubies Team NEEDS to HUSH!! This can NOT get OUT! I repeat: The Mission CAN NOT Get out! These prizes are TOO big to share!!!!!!!!http://www.aboverubiesstudio.com/  hurry go hear before they figure it out.